
はじめに
一覧テーブルのソートを指定するインジケータを CSS で作成する方法を紹介します。
Font Awesome などの Web フォントを使うこともできますが、ここでは CSS だけで作成していきます。
CSS で三角形を書くCSSトリック を順を追って説明し、ソートインジケータを作っていきます。
CSS で三角形を作る
CSS で三角形を作る流れを段階を追って見ていきます。
準備
わかりやすいように、200 x 200 のパネルを準備します。
<div id="panel">
  <div class="indicator">
  </div>
</div>
CSS は以下のようにしておきましょう。
#panel {
  width: 200px;
  height: 200px;
  border: 1px solid;
}
この段階では以下のような表示となります。

ボーダーで正方形を書く
作成したパネル内に以下のような CSS で正方形を書きます。
.indicator::before {
  content: "";
  height: 100px;
  width: 100px;
  position: absolute;
  border: 10px solid;
  border-bottom-color: #aaa;
}
border-bottom-color で下端のボーダーの色を変えています。
この段階では以下のような表示となります。

ボーダーを広くする
ボーダーの幅を 20px に変更してみましょう。
.indicator::before {
  content: "";
  height: 100px;
  width: 100px;
  position: absolute;
  border: 20px solid;
  border-bottom-color: #aaa;
}
以下のような表示になります。

ここまでで気づいたと思いますが、ボーダー同士は鋭角で接合するので、さらに幅を太くしてくと、三角形が現れます。
ボーダーをさらに広くする
ボーダーを目一杯広く変えます。
.indicator::before {
  content: "";
  height: 100px;
  width: 100px;
  position: absolute;
  border: 50px solid;
  border-bottom-color: #aaa;
}
以下のように灰色の三角形ができあがりました。

不要なボーダーを消す
下端以外のボーダーを transparent として透明にします。
.indicator::before {
  content: "";
  height: 100px;
  width: 100px;
  position: absolute;
  border: 50px solid transparent;
  border-bottom-color: #aaa;
}
三角形が出来上がりました。

2つ目の三角形を作成する
同じように after でもう一つ三角形を追加します。
.indicator::after {
  content: "";
  height: 100px;
  width: 100px;
  position: absolute;
  border: 50px solid transparent;
  border-top-color: #555;
}
わかりやすくするため、色を変えています。

2つの三角形の並びを調整する
ソートインジケータとなるように位置を調整してします。
.indicator::before {
  content: "";
  height: 100px;
  width: 100px;
  position: absolute;
  border: 50px solid transparent;;
  border-bottom-color: #aaa;
  margin-top: -5px;
}

.indicator::after {
  content: "";
  height: 100px;
  width: 100px;
  position: absolute;
  border: 50px solid transparent;;
  border-top-color: #555;
  margin-top: 105px;
}

ではこれらをテーブルに配置してみましょう。
テーブルを作る
ソートインジケータをつけるテーブルを作成します。
<table class="table table-bordered">
  <thead>
    <tr>
      <th>#</th>
      <th>First</th>
      <th>Last</th>
    </tr>
  </thead>
  <tbody>
    <tr>
      <td>1</td>
      <td>Mark</td>
      <td>Otto</td>
    </tr>
    <tr>
      <td>2</td>
      <td>Jacob</td>
      <td>Thornton</td>
    </tr>
  </tbody>
</table>
以下のようになります。

ソートインジケータ を付ける
th 要素に配備します。
.table th {
  cursor: pointer;
  position: relative;
}

.table th::before, .table th::after {
  content: "";
  height: 0;
  width: 0;
  position: absolute;
  border: 5px solid transparent;
  right: 10px;
  top: 50%;
}

.table th::before {
    border-bottom-color: #aaa;
    margin-top: -10px;
}
.table th::after {
    border-top-color: #aaa;
    margin-top: 2px;
}
画面は以下のような表示になります。

ここまでで、以下のようなコードになりました。
<!DOCTYPE html>
<html>
<head>
    <meta charset="UTF-8">
    <meta name="viewport" content="width=device-width, initial-scale=1, shrink-to-fit=no">
    <link rel="stylesheet" href="https://stackpath.bootstrapcdn.com/bootstrap/4.3.1/css/bootstrap.min.css" integrity="sha384-ggOyR0iXCbMQv3Xipma34MD+dH/1fQ784/j6cY/iJTQUOhcWr7x9JvoRxT2MZw1T" crossorigin="anonymous">

    <style>
      .container {
        margin: 50px;
      }

      .table th {
        cursor: pointer;
        position: relative;
      }

      .table th::before, .table th::after {
        content: "";
        height: 0;
        width: 0;
        position: absolute;
        border: 5px solid transparent;
        right: 10px;
        top: 50%;
      }

      .table th::before {
          border-bottom-color: #aaa;
          margin-top: -10px;
      }
      .table th::after {
          border-top-color: #aaa;
          margin-top: 2px;
      }
    </style>

</head>
<body>

<div class="container">
  <table class="table table-bordered">
    <thead>
      <tr>
        <th>#</th>
        <th>First</th>
        <th>Last</th>
      </tr>
    </thead>
    <tbody>
      <tr>
        <td>1</td>
        <td>Mark</td>
        <td>Otto</td>
      </tr>
      <tr>
        <td>2</td>
        <td>Jacob</td>
        <td>Thornton</td>
      </tr>
    </tbody>
  </table>
</div>

</body>
</html>
クリックイベントで動きを付ける
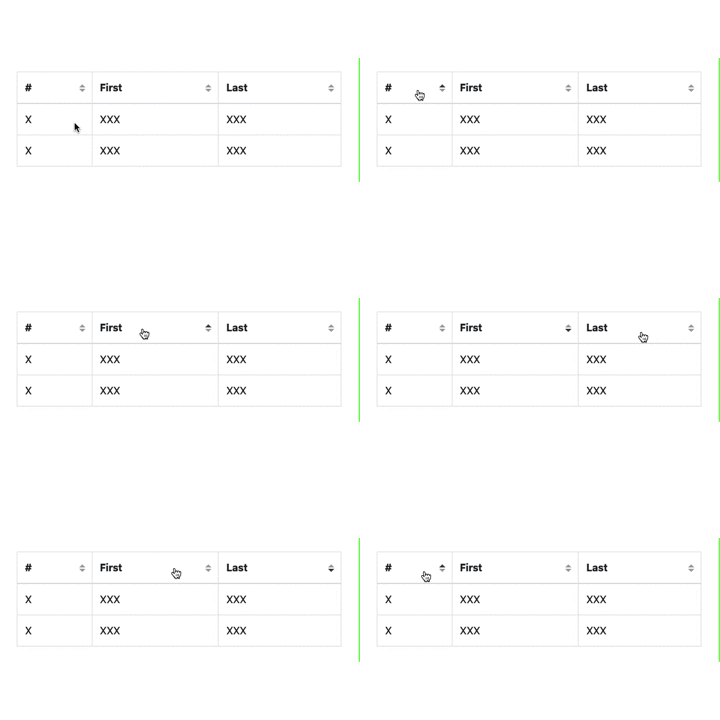
クリックイベントに応じてソートインジケータを変化させます。
th タグに class として asc desc を付けることにします。
CSS に以下を追加します。
      .table th.asc::before {
          border-bottom-color: #444;
      }
      .table th.desc::after {
          border-top-color: #444;
      }
JS でクリックイベントに応じて、class asc desc を付け替えるようにします。
let ths = document.getElementsByTagName("th");
for (var i = 0; i < ths.length; i++) {
    ths[i].onclick = event => {
        let element = event.target;
        if (element.classList.contains('asc')) {
            element.classList.replace('asc', 'desc');
        } else if (element.classList.contains('desc')) {
            element.classList.replace('desc', 'asc');
        } else {
            element.classList.add('asc');
        }

        Array.from(element.parentNode.children)
            .filter(e => e !== element)
            .forEach(e => e.classList.remove('asc', 'desc'));
    };
}
実際の並べ替え操作は行わす、ソートインジケータの表示切り替えのみ対応しています。
なお getElementsByTagName() は NodeList を返すので forEach が使えないので普通に for ループしています。
以下のような見た目となりました。

CSSで矢印版 ソートインジケータを作る
せっかくなので、三角形ではなく、矢印のケースも見ていきましょう。
ボーダーで辺を書く
top と right にボーダーで線を書きます。
.indicator::before {
  content: "";
  height: 100px;
  width: 100px;
  position: absolute;
  border-top: 10px solid;
  border-right: 10px solid;
}
以下のような表示になりました。

ボーダーを回転させて矢印にする
transform で回転させます。
.indicator::before {
  content: "";
  height: 100px;
  width: 100px;
  position: absolute;
  border-top: 10px solid;
  border-right: 10px solid;
  transform: translateY(50px) translateX(50px) rotate(-45deg);
}
transform は、実際に使う場合には -webkit-transform や -moz-transform, -ms-transform などのベンダープレフィックス付きのものを合わせて定義しておいた方がよいです。
以下のような表示になりました。

2つ目の矢印を作成する
では、下側の矢印も用意しましょう。
.indicator::before {
  content: "";
  height: 100px;
  width: 100px;
  position: absolute;
  border-top: 10px solid;
  border-right: 10px solid;
  transform: translateY(20px) translateX(50px) rotate(-45deg);
}

.indicator::after {
  content: "";
  height: 100px;
  width: 100px;
  position: absolute;
  border-top: 10px solid;
  border-right: 10px solid;
  transform: translateY(80px) translateX(50px) rotate(135deg);
}
以下のような表示になりました。

テーブルに配置する
サイズや色を調整してテーブルに配備しましょう。
基本的には、先の例と同様です。
.table th {
  cursor: pointer;
  position: relative;
}

.table th::before, .table th::after {
  content: "";
  height: 8px;
  width: 8px;
  position: absolute;
  border-top: 2px #888 solid;
  border-right: 2px #888 solid;
  right: 10px;
  top: 50%;
}

.table th::before {
  transform: translateY(-8px) rotate(-45deg);
}
.table th::after {
  transform: translateY(2px) rotate(135deg);
}
ソートインジケータが付きました。

まとめ
CSS で三角形や矢印を作り、テーブルのソートを行うソートインジケータを作成しました。
画像やフォントを使うより柔軟な調整が効きますし、比較的簡単に実装することができるのでおすすめです。

1冊ですべて身につくHTML & CSSとWebデザイン入門講座
- 作者: Mana
- 出版社/メーカー: SBクリエイティブ
- 発売日: 2019/03/16
- メディア: 単行本
- この商品を含むブログを見る

Web制作者のためのCSS設計の教科書 モダンWeb開発に欠かせない「修正しやすいCSS」の設計手法 Web制作者のための教科書シリーズ
- 作者: 谷拓樹
- 出版社/メーカー: インプレス
- 発売日: 2014/07/24
- メディア: Kindle版
- この商品を含むブログ (1件) を見る

- 作者: Lea Verou,牧野聡
- 出版社/メーカー: オライリージャパン
- 発売日: 2016/07/23
- メディア: 単行本(ソフトカバー)
- この商品を含むブログ (1件) を見る