はじめに
簡単なサンプルを交えて TypeScript の始め方について紹介します。
Node のインストール
Node (と npm ) がインストールされているものとします。未導入の場合は以下を参照してください。
ここでは現在の最新の LTS(Long Term Support) 版として以下を使います。
$ node -v
v12.18.0
$ npm -v
6.14.4
プロジェクトの初期化
TypeScript コンパイラは npm パッケージとして公開されています。
最初にプロジェクトディレクトリを作成し、npm で初期化(package.jsonファイルを作成)します。
$ mkdir example
$ cd example
$ npm init -y
npm init に -y オプションを付けることで、デフォルト構成の package.json が問い合わせ無しで作成されます。
作成された package.json は以下のようになります。
{
  "name": "example",
  "version": "1.0.0",
  "description": "",
  "main": "index.js",
  "scripts": {
    "test": "echo \"Error: no test specified\" && exit 1"
  },
  "author": "",
  "license": "ISC"
}
TypeScript コンパイラの導入
TypeScript コンパイラと Node.js 用の型宣言をインストールします。
$ npm install --save-dev typescript @types/node
--save-dev で は省略形の -D でも同様です。省略形でnpm i -D typescript @types/node とすることもできます。
-g を付けるとグローバルな環境へインストールすることができますが、通常 -g は付けずにローカルインストールを行います。
typescript@next とすると、(現時点では) 4系バージョンの TypeScript コンパイラを導入できます。
この時点で package.json は以下のようになります。
{
  "name": "example",
  "version": "1.0.0",
  "description": "",
  "main": "index.js",
  "scripts": {
    "test": "echo \"Error: no test specified\" && exit 1"
  },
  "keywords": [],
  "author": "",
  "license": "ISC",
  "devDependencies": {
    "@types/node": "^14.0.12",
    "typescript": "^3.9.5"
  }
}
TypeScript の設定
プロジェクトルートに TypeScript の設定ファイルである tsconfig.json を作成します。このファイルにて TypeScript コンパイラの各種オプションを指定します。
touch tsconfig.json として編集してもいいですし、以下のようにして雛形を作成することもできます。
$ npx tsc --init
npx は npm に同梱されているコマンドで、ローカルにインストールしたコマンドでも ./node_modules/.bin/tsc --init のようにパス指定することなく実行することができます。
作成された tsconfig.json を見てみましょう。
以下のようにほとんどがコメントですが、大量のオプションが記載されています。
{
  "compilerOptions": {
    /* Visit https://aka.ms/tsconfig.json to read more about this file */

    /* Basic Options */
    // "incremental": true,                   /* Enable incremental compilation */
    "target": "es5",                          /* Specify ECMAScript target version: 'ES3' (default), 'ES5', 'ES2015', 'ES2016', 'ES2017', 'ES2018', 'ES2019', 'ES2020', or 'ESNEXT'. */
    "module": "commonjs",                     /* Specify module code generation: 'none', 'commonjs', 'amd', 'system', 'umd', 'es2015', 'es2020', or 'ESNext'. */
    // "lib": [],                             /* Specify library files to be included in the compilation. */
    // "allowJs": true,                       /* Allow javascript files to be compiled. */
    ...中略
    /* Advanced Options */
    "skipLibCheck": true,                     /* Skip type checking of declaration files. */
    "forceConsistentCasingInFileNames": true  /* Disallow inconsistently-cased references to the same file. */
  }
}
ここでは tsconfig.json を以下のように編集します。
{
  "compilerOptions": {
    "target": "es2015",
    "module": "commonjs",
    "lib": ["es2015"],
    "sourceMap": true,
    "outDir": "dist",
    "strict": true,
    "esModuleInterop": true,
    "skipLibCheck": true,
    "forceConsistentCasingInFileNames": true
  },
  "include": [
    "src/**/*"
  ]
}
compilerOptions でコンパイルのオプションを定義しています。
include でsrc 配下のファイル全てをコンパイル対象に指定しています。include を指定しない場合はプロジェクトディレクトリ配下の TypeScriptファイル( *.ts *.d.ts *.tsx) が対象になります。
各コンパイラオプションの意味は以下の通りです。
| オプション | 説明 |
|---|---|
target |
どの JavaScript バージョン(ES3、ES5、ES2015、ES2016 など)にコンパイルするかを指定 |
module |
どのモジュールシステム(CommonJS、SystemJS、ES2015 など)にコンパ イルすべきかを指定 |
lib |
コードを実行する環境にどのAPIが存在しているとTSCが想定すべきかを指定。ES5 の Function.prototype.bind、ES2015 の Object.assign、DOM の document. querySelectorのようなものが含まれる。 |
sourceMap |
JavaScript の mapファイルを生成するかを指定 |
outDir |
生成する JavaScript コードの出力先を指定 |
strict |
不正なコードをチェックする時に厳格にチェックする。このオプションに よって、すべてのコードが適切に型付けされていることが強制される |
esModuleInterop |
CommonJS と ES Modules の相互運用を可能とする |
skipLibCheck |
型定義ファイルの型チェックをスキップするか |
forceConsistentCasingInFileNames |
大文字小文字を区別して参照を解決するか |
Hello TypeScript
準備ができたので、早速コンパイルしてみましょう。
src ディレクトリに index.ts を作成します。
$ mkdir src
$ touch src/index.ts
src/index.ts は以下のように編集します。
let greet = (name: string) => 'Hello ' + name

console.log(greet('TypeScript'))
単純にコンソールに Hello しているだけです。
コンパイルは tsc コマンドで行います。
$ ./node_modules/.bin/tsc
npx を使って以下のようにしても同様です。
$ npx tsc
コンパイルが完了すれば、dist ディレクトリに index.js と index.js.map が生成されます。
生成された index.js は以下のようになりました。
"use strict";
let greet = (name) => 'Hello ' + name;
console.log(greet('TypeScript'));
//# sourceMappingURL=index.js.map
以下のように実行することができます。
$ node ./dist/index.js
Hello TypeScript!!
DOM 操作
ここまでは Node で実行しましたが、もちろんブラウザで実行することもできます。
TypeScript で DOM を操作するには、tsconfig.json を以下のように編集します。
{
  "compilerOptions": {
    ...
    "lib": ["es2015", "dom"],
    ...
}
TypeScript の組み込みのブラウザーと DOM の型宣言を含めています。
プロジェクトルートに index.html を作成します。
<!DOCTYPE html>
<html>
  <head>
    <title>TypeScript example</title>
  </head>
  <body>
    <div id="app"></div>
    <script src="dist/index.js"></script>
  </body>
</html>
src/index.ts を以下のように編集します。
let p = document.createElement("p");
let input = document.createElement('input')
input.addEventListener('input', () =>
  p.textContent = input.value.toUpperCase()
)

const app = document.getElementById("app")
app?.appendChild(input)
app?.appendChild(p)
コンパイルして
$ npx tsc
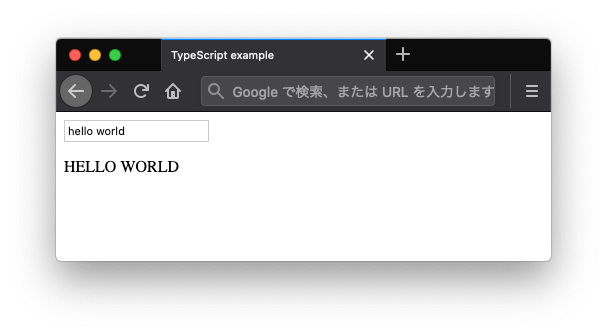
ブラウザで index.html を開くと以下のようになります。

入力に応じて出力文字が変更されます。
まとめ
TypeScript を使ったプロジェクトの準備と簡単なサンプルについて見ました。
次回は TypeScript の文法編に続きます。