Playタグ
前回はブログのトップページにてPostの一覧を表示した。Postの一覧はいくつかの方法で出力するため、Postの表示部をPlayタグとして切り出して再利用可能とする。tags ディレクトリ中に display という Playタグを作成。
app/views/tags/display.html というファイルで以下を作成する。
* { Display a post in one of these modes: 'full', 'home' or 'teaser' }*
<div class="post ${_as == 'teaser' ? 'teaser' : ''}">
<h2 class="post-title">
<a href="#">${_post.title}</a>
</h2>
<div class="post-metadata">
<span class="post-author">by ${_post.author.fullname}</span>,
<span class="post-date">${_post.postedAt.format('dd MMM yy')}</span>
#{if _as != 'full'}
<span class="post-comments">
| ${_post.comments.size() ?: 'no'}
comment${_post.comments.size().pluralize()}
#{if _post.comments}
, latest by ${_post.comments[0].author}
#{/if}
</span>
#{/if}
</div>
#{if _as != 'teaser'}
<div class="post-content">
<div class="about">Detail: </div>
${_post.content.nl2br()}
</div>
#{/if}
</div>
#{if _as == 'full'}
<div class="comments">
<h3>
${_post.comments.size() ?: 'no'}
comment${_post.comments.size().pluralize()}
</h3>
#{list items:_post.comments, as:'comment'}
<div class="comment">
<div class="comment-metadata">
<span class="comment-author">by ${comment.author},</span>
<span class="comment-date">
${comment.postedAt.format('dd MMM yy')}
</span>
</div>
<div class="comment-content">
<div class="about">Detail: </div>
${comment.content.escape().nl2br()}
</div>
</div>
#{/list}
</div>
#{/if}
上記タグを利用するよう/app/views/Application/index.htmlを以下に変更。上記で作成したタグである #{display }タグが利用できるようになる。
#{extends 'main.html' /}
#{set title:'Home' /}

#{if frontPost}

    #{display post:frontPost, as:'home' /}

    #{if olderPosts.size()}

        <div class="older-posts">
            <h3>Older posts <span class="from">from this blog</span></h3>

            #{list items:olderPosts, as:'oldPost'}
                #{display post:oldPost, as:'teaser' /}
            #{/list}
        </div>

    #{/if}

#{/if}

#{else}
    <div class="empty">
        There is currently nothing to read here.
    </div>
#{/else}
PlayのテンプレートエンジンはGroovyが使用されている。詳細については http://www.playframework.org/documentation/1.0.1/templates を参照。
レイアウトの改善
index.html のレイアウトは #{extends 'main.html' /} にてmain.htmlを拡張して定義している。main.html へ変更を加えて#{doLayout /}タグの上下にヘッダー部とフッダー部を追加。
/app/views/main.html を以下に変更する。
<!DOCTYPE html PUBLIC "-//W3C//DTD XHTML 1.0 Transitional//EN" "http://www.w3.org/TR/xhtml1/DTD/xhtml1-transitional.dtd">

<html xmlns="http://www.w3.org/1999/xhtml" xml:lang="en" lang="en">
    <head>
        <title>#{get 'title' /}</title>
        <meta http-equiv="Content-Type" content="text/html; charset=utf-8"/>
        <link rel="stylesheet" type="text/css" media="screen"
            href="@{'/public/stylesheets/main.css'}" />
        <link rel="shortcut icon" type="image/png"
            href="@{'/public/images/favicon.png'}" />
    </head>
    <body>

        <div id="header">
            <div id="logo">
                yabe.
            </div>
            <ul id="tools">
                <li>
                    <a href="#">Log in to write something</a>
                </li>
            </ul>
            <div id="title">
                <span class="about">About this blog</span>
                <h1><a href="#">${blogTitle}</a></h1>
                <h2>${blogBaseline}</h2>
            </div>
        </div>

        <div id="main">
            #{doLayout /}
        </div>

        <p id="footer">
            Yabe is a (not that) powerful blog engine built with the
            <a href="http://www.playframework.org">play framework</a>
            as a tutorial application.
        </p>

    </body>
</html>
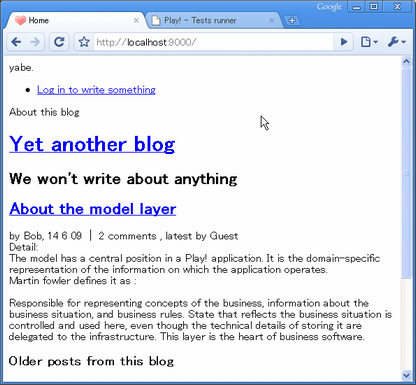
main.htmlでは blogTitle と blogBaseline という変数を表示することとしているが、この変数は定義していないので表示されていない。共通で利用する変数については @Before インタセプターを定義したメソッドを用意することで対応できる。今回はアプリケーション全体についての共通処理として、/app/controllers/Application.java に以下のメソッドを追加する。
@Before
static void addDefaults() {
    renderArgs.put("blogTitle", Play.configuration.getProperty("blog.title"));
    renderArgs.put("blogBaseline", Play.configuration.getProperty("blog.baseline"));
}
Play.configuration.getProperty にてconfigファイルからプロパティ値を読み込み renderArgs に設定。プロパティ値は /conf/application.conf に以下を追加。
# Configuration of the blog engine
blog.title=Yet another blog
blog.baseline=We won't write about anything
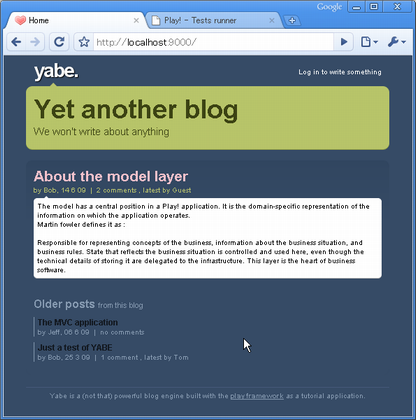
http://www.playframework.org/documentation/1.0.1/files/main.css にあるスタイルシートを/public/stylsheets/main.css に反映。


