- はじめに
- プロジェクトの作成
- 最初のアプリケーション
- 画面レイアウトの設計
- レイアウト構築の概要
- レイアウトの実装
- エンティティの準備
- アカウント一覧コンポーネントの作成
- アカウント一覧のフィルタリング
- AccountService の追加
- アカウント編集フォームの作成
- アカウント編集ダイアログの作成
- アプリケーションの実行
- まとめ
はじめに
Java でプロダクト構築時に一番悩むのは、フロントエンドに何を採用するかです。
React (や Vue.js や Angular ) で作ってサーバ側は JAX-RS で受けるか、成熟した JSF で作るか、Thymleaf などのテンプレートエンジンとMVCで作るか。
いずれにしてもつらいのが、機能追加やリファクタリング時にフロントエンド側を合わせて変更する場合で、どうしてもサーバ側を変更した後でフロントエンド側を対処的に修正しなければいけない点です(コンパイルエラーとして検知できないので)。
また、言語の差異に対するコンテキストを切り替えながら作業しなければならない点からも効率的ではありません。
Vaadin は UI を Java だけでなんとかできる UI フレームワークで、上記不満を解消してくれます。
インタラクティブな凝った UI は JavaScript に頼らなければならない場面もありますが、社内の管理画面などは Vaadin でもいいかなと思います。
本稿では、Vaadin を使った簡単なアプリケーション作成の流れを紹介します。
バックエンドには Spring Boot を使うことにします(JavaEE でも プレーンなサーブレットでも可能です)。
Vaadin は、以前は GWT を使っていましたが、現在は webpack などを使った Web Components をベースにしています。
そのため、開発環境には Node.js(npm) が必要です。
導入は以下などを参照してください。
本稿で利用する環境は以下の通りです。
$ npm --version
6.12.1

$ java -version
openjdk version "11.0.4" 2019-07-16 LTS
OpenJDK Runtime Environment Corretto-11.0.4.11.1 (build 11.0.4+11-LTS)
OpenJDK 64-Bit Server VM Corretto-11.0.4.11.1 (build 11.0.4+11-LTS, mixed mode)

$ gradle -version
------------------------------------------------------------
Gradle 5.6.2
------------------------------------------------------------
プロジェクトの作成
Gradle の init タスクでプロジェクトを作成します。
$ mkdir vaadin-spring
$ cd vaadin-spring
$ gradle init

Select type of project to generate:
  1: basic
  2: application
  3: library
  4: Gradle plugin
Enter selection (default: basic) [1..4] 2

Select implementation language:
  1: C++
  2: Groovy
  3: Java
  4: Kotlin
  5: Swift
Enter selection (default: Java) [1..5] 3

Select build script DSL:
  1: Groovy
  2: Kotlin
Enter selection (default: Groovy) [1..2] 1

Select test framework:
  1: JUnit 4
  2: TestNG
  3: Spock
  4: JUnit Jupiter
Enter selection (default: JUnit 4) [1..4] 4

Project name (default: vaadin-spring):
Source package (default: vaadin.spring):

> Task :init
Get more help with your project: https://docs.gradle.org/5.6.2/userguide/tutorial_java_projects.html

BUILD SUCCESSFUL in 18s
2 actionable tasks: 2 executed
プロジェクトが作成されたら bild.gradle を以下のように編集します。
plugins {
  id 'java'
  id 'org.springframework.boot' version '2.2.1.RELEASE'
}

repositories {
  jcenter()
}

dependencies {
  implementation enforcedPlatform('org.springframework.boot:spring-boot-dependencies:2.2.1.RELEASE')
  implementation 'com.vaadin:vaadin-spring-boot-starter:14.0.13'
}
Vaadin には Spring Boot 用の starter が準備されているので、vaadin-spring-boot-starter を依存に指定しています。
最初のアプリケーション
最初に簡単なアプリケーションを作成しましょう。
Spring Boot のアプリケーションクラスを以下のように作成します。
package vaadin.spring;

import org.springframework.boot.SpringApplication;
import org.springframework.boot.autoconfigure.SpringBootApplication;

@SpringBootApplication
public class App {

  public static void main(String[] args) {
    SpringApplication.run(App.class, args);
  }
}
続いて Vaadin のビューコンポーネントを作成します。
package vaadin.spring;

import com.vaadin.flow.component.button.Button;
import com.vaadin.flow.component.notification.Notification;
import com.vaadin.flow.component.orderedlayout.VerticalLayout;
import com.vaadin.flow.router.Route;

@Route
public class MainView extends VerticalLayout {

    public MainView() {

        Notification notification = new Notification(
                "This notification is located on Top-End", 1500,
                Notification.Position.TOP_END);

        Button button = new Button("Click me", event -> notification.open());
        add(button);
    }
}
VerticalLayout を継承した MainView クラスを作成しました。
コンストラクタでボタンに対するアクションリスナを登録し、クリックイベントで Notification コンポーネントを表示するだけの簡単なものです。
MainView クラス の @Route アノテーションに注目しましょう。
Vaadin では @Route でアノテートすることでリクエストとのマッピングを行います。
@Route("index") のようにパスを指定することで、index というパスのリクエストにビューが応答します。
パス文字列を省略した場合は、コンポーネント名の末尾から View を除いたものが暗黙的に設定されます。
ただし、Main というコンポーネント名は特別に @Route("") と指定されたものとして扱われます。
MainView は Vaadin の UI コンポーネントです。また Button や Notification もコンポーネントで、これらのコンポーネントを組み合わせることで UI を構築していきます。
準備するのはこれだけです。早速実行してみましょう。
$ ./gradlew bootRun

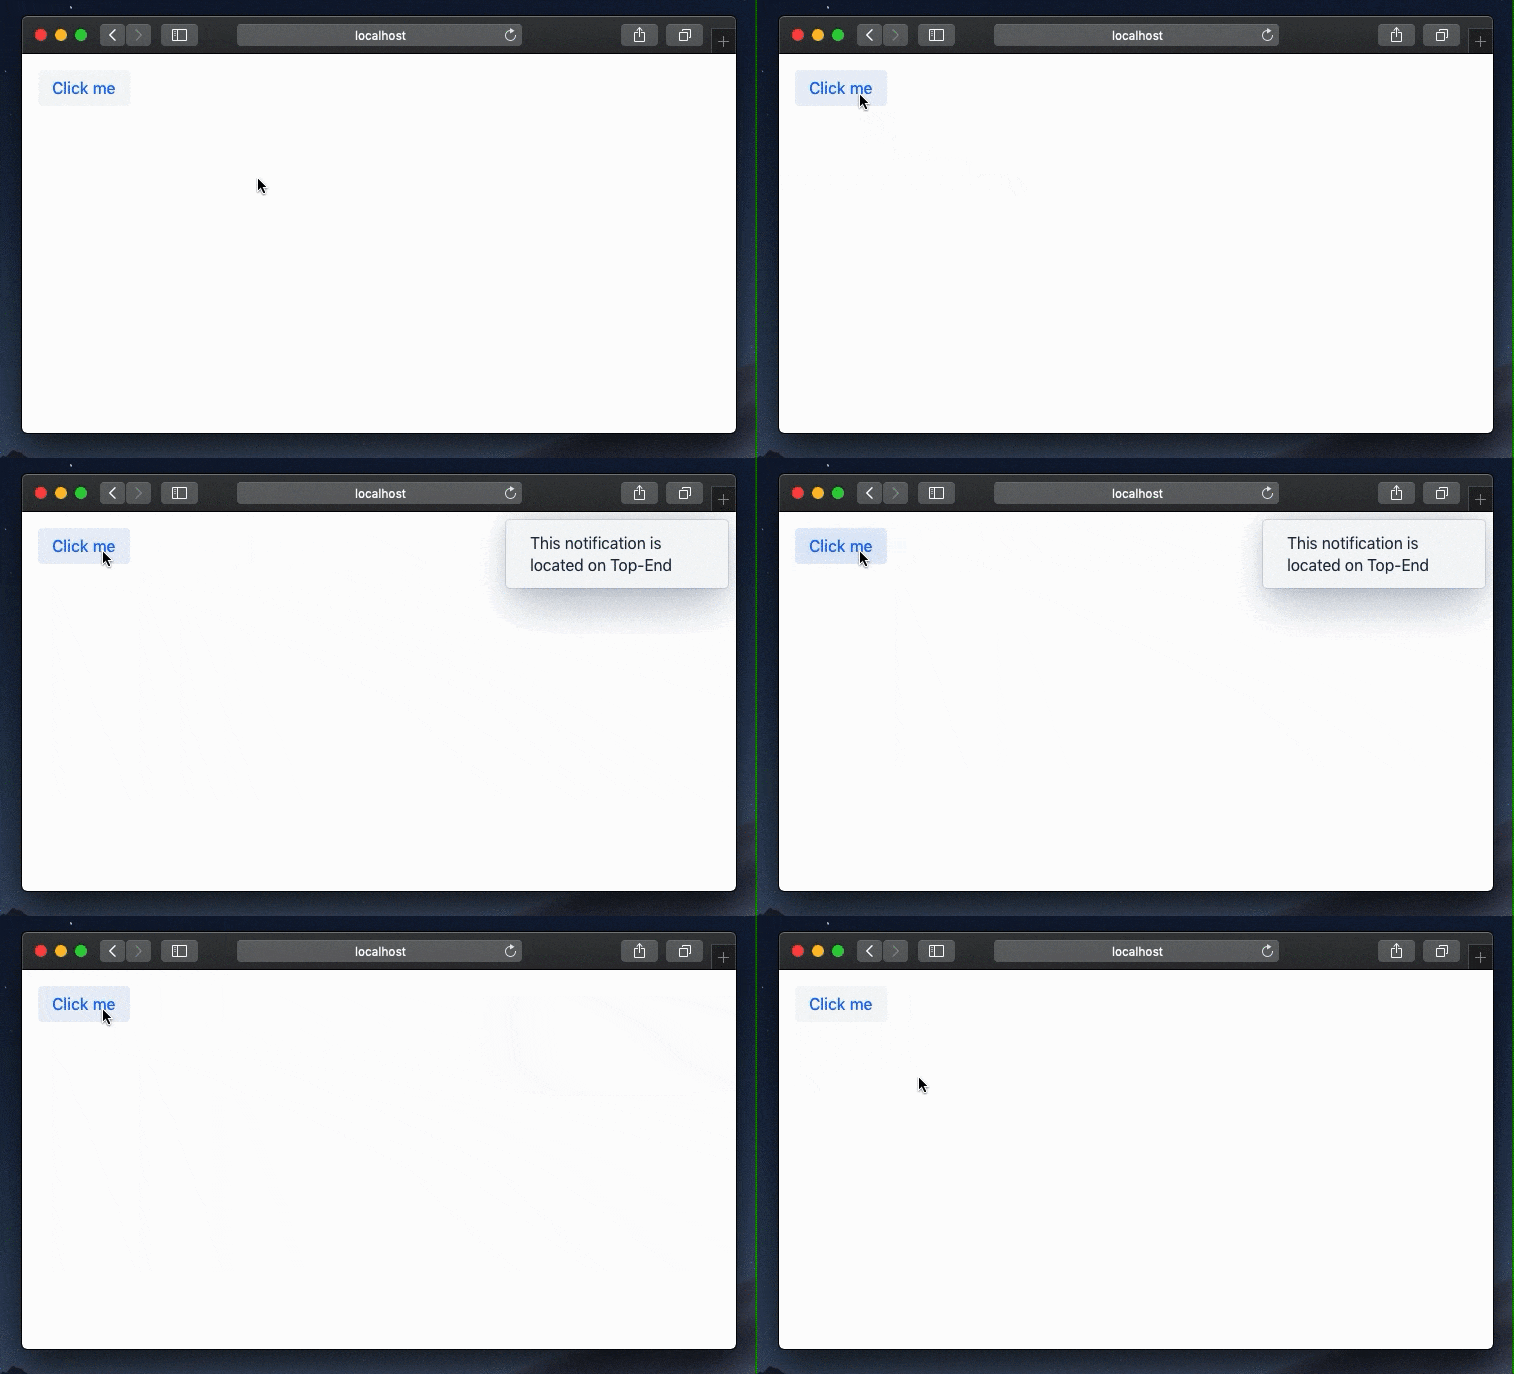
ボタンクリックに応じて Notification が表示できました。
続いてもう少し複雑な例を見ていきます。
まずは、画面の共通レイアウトを定義する方法を説明します。
画面レイアウトの設計
サイドバーにメニューがあり、ヘッダーとフッダーがあるような典型的なレイアウトを考えます。

上記図中の要素を以下のようなコンポーネントを組み合わせて UI を構築していくことにします。
private FlexLayout row;
private Navi navi;
private FlexLayout column;

private Div header;
private FlexLayout viewContainer;
private Div footer;
図中のオレンジで示した viewContainer の中身をサイドメニューの選択に応じたコンポーネントを表示できるようにしましょう。
レイアウト構築の概要
まずは、レイアウト構築の概要について見ておきましょう(詳細は後ほど示します)。
最初に viewContainer の中に構成するコンポーネントです。
@PageTitle("Home")
@Route(value = "", layout = MainLayout.class) // MainLayout を指定
public class Home extends ViewFrame {

    public Home() {
        setId("home");
        setViewContent(createContent());
    }

    private Component createContent() {
        // ...
    }
}
@Route アノテーションで layout = MainLayout.class としてレイアウト用のコンポーネントを指定することでレイアウトを適用します(Home コンポーネントが継承している ViewFrame は後ほど示します)。
そしてレイアウト定義の MainLayout は以下のようになります。
public class MainLayout extends FlexLayout
        implements RouterLayout {

    private FlexLayout row;
    private Navi navi;
    private FlexLayout column;

    private Div header;
    private FlexLayout viewContainer;
    private Div footer;


    public MainLayout() {
        setSizeFull();
        navi = new Navi();
        viewContainer = new FlexLayout();

        // 以下各種コンポーネントの構築...
    }

    @Override
    public void showRouterLayoutContent(HasElement content) {
        this.viewContainer.getElement().appendChild(content.getElement());
    }
}
コンストラクタにて、画面で示した構造でそれぞれのコンポーネントを組み立てます。
Home 画面へのアクセス時には showRouterLayoutContent(HasElement content) が呼ばれるため、ここで viewContainer コンポーネントの子要素として要素を追加しています。
これにより、メニュークリック時の画面遷移で viewContainer に各画面要素が埋め込まれることとなります。
レイアウトの実装
では、全体を見ていきます。
最初にviewContainer の中に表示するコンポーネントの親クラスを作成します。
package vaadin.spring.views;

import com.vaadin.flow.component.Component;
import com.vaadin.flow.component.Composite;
import com.vaadin.flow.component.HasStyle;
import com.vaadin.flow.component.html.Div;

public class ViewFrame extends Composite<Div> implements HasStyle {

    private String CLASS_NAME = "view-frame";

    private Div content;

    public ViewFrame() {

        content = new Div();
        content.setClassName(CLASS_NAME + "_content");

        setClassName("view-frame");
        getContent().add(content);

    }

    public void setViewContent(Component... components) {
        content.removeAll();
        content.add(components);
    }
}
Composite を継承した ViewFrame を作成しました。
このクラスを継承して、画面遷移に応答するコンポーネントを作成します。
1 つ目は先ほど示した Home コンポーネントです。
package vaadin.spring.views;

import com.vaadin.flow.component.Component;
import com.vaadin.flow.component.html.H1;
import com.vaadin.flow.component.orderedlayout.FlexLayout;
import com.vaadin.flow.component.orderedlayout.VerticalLayout;
import com.vaadin.flow.router.PageTitle;
import com.vaadin.flow.router.Route;

@PageTitle("Home")
@Route(value = "", layout = MainLayout.class)
public class Home extends ViewFrame {

    public Home() {
        setId("home");
        setViewContent(createContent());
    }

    private Component createContent() {
        VerticalLayout vLayout = new VerticalLayout();
        vLayout.add(new H1("Home"));
        FlexLayout content = new FlexLayout(vLayout);
        return content;
    }
}
Home と表示するだけのコンポーネントです。
同じようにアカウント一覧を表示するコンポーネントを作成します。
package vaadin.spring.views;

import com.vaadin.flow.component.Component;
import com.vaadin.flow.component.html.H1;
import com.vaadin.flow.component.orderedlayout.FlexLayout;
import com.vaadin.flow.component.orderedlayout.VerticalLayout;
import com.vaadin.flow.router.PageTitle;
import com.vaadin.flow.router.Route;

@PageTitle("Accounts")
@Route(value = "accounts", layout = MainLayout.class)
public class Accounts extends ViewFrame {

    public Accounts() {
        setId("accounts");
        setViewContent(createContent());
    }

    private Component createContent() {
        VerticalLayout vLayout = new VerticalLayout();
        vLayout.add(new H1("Accounts"));
        FlexLayout content = new FlexLayout(vLayout);
        return content;
    }

}
@Route で accounts というパスに応答するものとしておきます。
コンテンツの中身は、「Accounts」という文字を表示するだけのものとしておきます(後ほど一覧画面を作成します)。
サイドのナビゲーションバーを作成します。
package vaadin.spring.views;

import com.vaadin.flow.component.Component;
import com.vaadin.flow.component.html.Div;
import com.vaadin.flow.component.html.H4;
import com.vaadin.flow.component.html.Span;
import com.vaadin.flow.component.icon.Icon;
import com.vaadin.flow.component.icon.VaadinIcon;
import com.vaadin.flow.router.HighlightConditions;
import com.vaadin.flow.router.RouterLink;

public class Navi extends Div {

    public Navi() {

        add(new H4("Menu"));
        addClassName("navi");

        add(naviItem(VaadinIcon.HOME, "Home", Home.class));
        add(naviItem(VaadinIcon.USERS, "Accounts", Accounts.class));
    }

    private Component naviItem(
            VaadinIcon icon,
            String text,
            Class<? extends Component> navigationTarget) {

        // Router による内部的な画面遷移のリンク
        RouterLink routerLink = new RouterLink(null, navigationTarget);
        routerLink.add(new Span(text));
        routerLink.setHighlightCondition(HighlightConditions.sameLocation());

        Div item = new Div();
        item.add(new Icon(icon), routerLink);
        item.setClassName("menu-item");

        return item;
    }

}
Div コンポーネントにリンクを追加しているだけの簡単なものとしました。
RouterLink として先ほど作成したコンポーネントを指定しています。
これにより、リンクのクリックで指定したコンポーネントへの遷移を実現します。
最後に、先ほど示した MainLayout の全体を示します。
package vaadin.spring.views;

import com.vaadin.flow.component.HasElement;
import com.vaadin.flow.component.Text;
import com.vaadin.flow.component.dependency.CssImport;
import com.vaadin.flow.component.html.Div;
import com.vaadin.flow.component.orderedlayout.FlexLayout;
import com.vaadin.flow.router.RouterLayout;

@CssImport("styles/style.css")
public class MainLayout extends FlexLayout
        implements RouterLayout {

    private FlexLayout row;
    private Navi navi;

    private Div header;
    private FlexLayout viewContainer;
    private Div footer;

    private FlexLayout column;


    public MainLayout() {
        setSizeFull();
        initStructure();
        initHeadersAndFooters();
    }


    private void initStructure() {

        navi = new Navi();
        viewContainer = new FlexLayout();

        column = new FlexLayout(viewContainer);
        column.setFlexGrow(1, viewContainer);
        column.setClassName("main-column");
        column.getStyle().set("flex-direction", "column");

        row = new FlexLayout(navi, column);
        row.setFlexGrow(1, column);

        add(row);
        setFlexGrow(1, row);

    }


    private void initHeadersAndFooters() {

        header = new Div();
        header.add(new Text("Header"));
        header.setClassName("main-header");
        column.getElement().insertChild(0, header.getElement());

        footer = new Div();
        footer.add(new Text("Footer"));
        footer.setClassName("main-footer");
        column.getElement().insertChild(
                column.getElement().getChildCount(), footer.getElement());
    }

    @Override
    public void showRouterLayoutContent(HasElement content) {
        this.viewContainer.getElement().appendChild(content.getElement());
    }

}
先ほどの例に加え、@CssImport("styles/style.css") を追加しています。
@CssImport はレイアウトに CSS を適用でき、プロジェクトルートから frontend/styles というディレクトリに配備した CSS をレイアウトに適用できます。
frontend/styles/style.css を以下のように作成します。
.navi {
  width: 200px;
  box-shadow: 2px 0 4px gray;
}

.navi h4 {
  rgba(24, 39, 57, 0.94)
  font-size: 1.5em;
  margin: 1.5em;
}

.main-header {
  color: #FFFFFF;
  background-color: #0d283a;
  font-size: 1.5em;
  padding: 20px;
}


.main-footer {
  background-color: rgba(25, 59, 103, 0.05);
  text-align: center;
  padding: 20px;
}

.menu-item {
  align-items: center;
  display: flex;
  font-weight: 500;
  height: 2.5em;
  text-decoration: none;
  padding-left: 20px;
}

.menu-item:hover {
  background-color: rgba(22, 118, 243, 0.1);
}

.menu-item:active {
  background-color: rgba(22, 118, 243, 0.1);
}

.menu-item iron-icon {
  color: rgba(28, 48, 74, 0.5);
  height: 1em;
  flex-shrink: 0;
  margin: 0 10px 0 0;
}

.view-frame {
  width: 100%;
}
Java 上でCSSをスタイル定義することもできますが、細かいレイアウトは CSS ファイルで行う方が見通しがよくなります。
ではここまで作成したものを実行してみましょう(最初に作った MainView は削除しておきます)。
$ ./gradlew bootRun

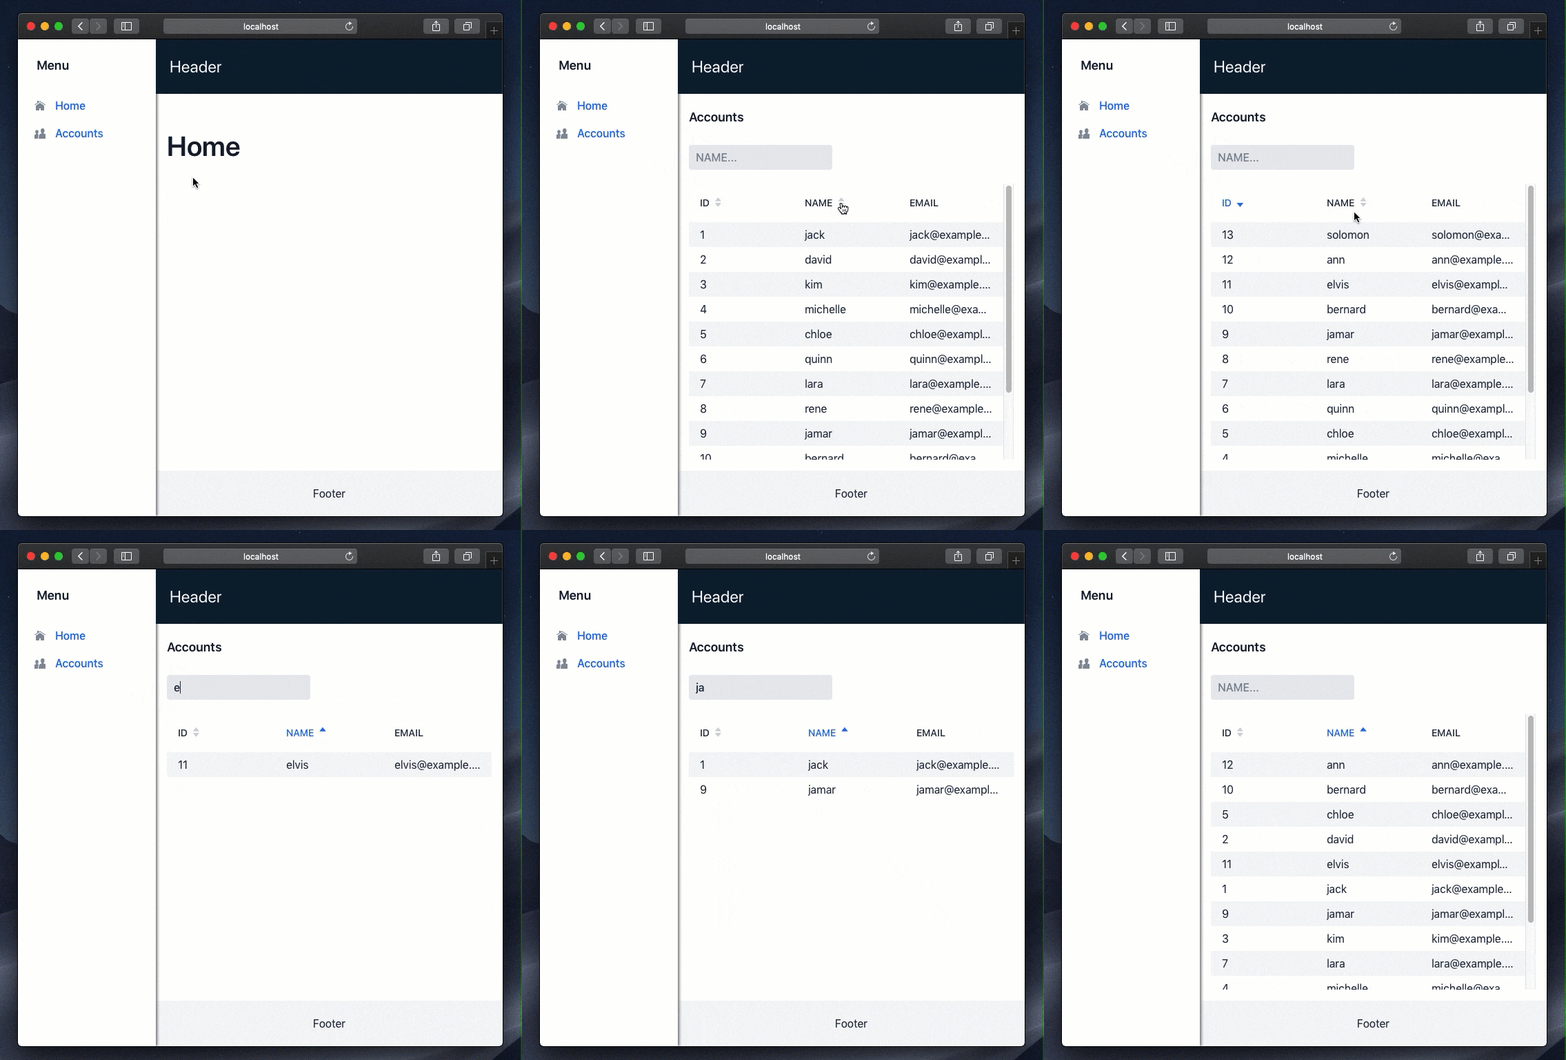
メニューのクリックにより、コンテンツが入れ替わっていることが確認できます。
なお、CSS の変更は Watchdog により監視されているので、アプリケーションは起動したままで変更内容が反映されるので開発時に便利です。
エンティティの準備
画面レイアウトができたので、遷移時に表示するコンテンツとしてアカウント一覧を作成していきます。
今回は Spring Data を使って画面に表示するアカウントを取得することにします。
最初に build.gradle に Spring Data の依存を追加します。
dependencies {
  implementation enforcedPlatform("org.springframework.boot:spring-boot-dependencies:2.2.1.RELEASE")
  implementation 'com.vaadin:vaadin-spring-boot-starter:14.0.13'
  // 以下を追加
  implementation 'org.springframework.boot:spring-boot-starter-data-jpa'
  runtimeOnly 'com.h2database:h2'
}
アカウント エンティティを以下のように定義します。
package vaadin.spring.domain;

import org.springframework.data.jpa.domain.AbstractPersistable;

import javax.persistence.Entity;
import javax.validation.constraints.NotNull;
import javax.validation.constraints.Pattern;
import javax.validation.constraints.Size;

@Entity
public class Account extends AbstractPersistable<Long> {

    @NotNull
    @Size(min = 3, max = 25)
    private String name;

    @NotNull
    @Pattern(regexp = "^[a-zA-Z0-9.!#$%&'*+/=?^_`{|}~-]+@[a-zA-Z0-9-]+(?:\\.[a-zA-Z0-9-]+)*$", message = "not email")
    private String email;

    public Account() { }

    public Account(String name, String email) {
        this.name = name;
        this.email = email;
    }

    // getter/setter ...

}
リポジトリも用意しましょう。
package vaadin.spring.domain;

import org.springframework.data.jpa.repository.JpaRepository;
import org.springframework.stereotype.Repository;
import java.util.List;

@Repository
public interface AccountRepository extends JpaRepository<Account, Long> {
    List<Account> findByNameStartingWith(String name);
}
最後にデモデータをアプリケーションの起動時に登録する処理を書きます。
@SpringBootApplication
public class App {
    // ...
    @Bean
    public CommandLineRunner demo(AccountRepository repository) {
        return (args) -> {
            repository.save(new Account("jack", "jack@example.com"));
            repository.save(new Account("david", "david@example.com"));
            repository.save(new Account("kim", "kim@example.com"));
            repository.save(new Account("michelle", "michelle@example.com"));
            repository.save(new Account("chloe", "chloe@example.com"));
            repository.save(new Account("quinn", "quinn@example.com"));
            repository.save(new Account("lara", "lara@example.com"));
            repository.save(new Account("rene", "rene@example.com"));
            repository.save(new Account("jamar", "jamar@example.com"));
            repository.save(new Account("bernard", "bernard@example.com"));
            repository.save(new Account("elvis", "elvis@example.com"));
            repository.save(new Account("ann", "ann@example.com"));
            repository.save(new Account("solomon", "solomon@example.com"));
        };
    }
}
アカウント一覧コンポーネントの作成
下準備が整ったので、先ほどは文字列を表示するだけだったコンポーネントにアカウント一覧を表示する処理を追加します。
Grid という一覧表示用のコンポーネントが用意されているので、これを使えば簡単に構築できます。
@PageTitle("Accounts")
@Route(value = "accounts", layout = MainLayout.class)
public class Accounts extends ViewFrame {

    private final AccountRepository repository;
    private final Grid<Account> grid = new Grid<>();

    public Accounts(AccountRepository repository) {
        this.repository = repository;

        setId("accounts");
        setViewContent(createContent());

        listAccounts();
    }

    private Component createContent() {

        // Grid コンポーネントの準備
        grid.addColumn(Account::getId)
                .setHeader("ID").setSortable(true);
        grid.addColumn(Account::getName)
                .setHeader("NAME").setSortable(true);
        grid.addColumn(Account::getEmail).setHeader("EMAIL");

        return new FlexLayout(new VerticalLayout(
                new H4("Accounts"),
                grid));
    }

    private void listAccounts() {
        // 一覧アイテムの設定
        grid.setItems(repository.findAll());
    }

}
grid.addColumn() でカラムを追加し、ヘッダ文字とソート可否の設定を追加しています。
コンポーネントの準備が整ったら、リポジトリから取得したアカウントの一覧 List<Account> を反映しています。
作業はこれだけです。
先ほどと同じように実行すれば、以下のようなアカウント一覧が表示されます。

アカウント一覧のフィルタリング
一覧画面を検索条件でフィルタリングできるようにしましょう。
Accounts コンポーネントを以下のように変更します(変更箇所をピックアップして示します)。
public class Accounts extends ViewFrame {

    // テキストフィールド追加
    private final TextField filterText = new TextField();

    private Component createContent() {

        // ...

        // フィルタフィールド初期化
        filterText.setPlaceholder("NAME...");
        filterText.setValueChangeMode(ValueChangeMode.EAGER);
        filterText.addValueChangeListener(event -> listAccounts());

        return new FlexLayout(new VerticalLayout(
                new H4("Accounts"),
                filterText,
                grid));
    }

    private void listAccounts() {
        // 前方一致検索に変更
        grid.setItems(repository.findByNameStartingWith(filterText.getValue()));
    }
テキストフィールドを ValueChangeMode.EAGER とすることで、キー入力の都度イベントが発火します。
ついでに Grid のテーマを変更してみましょう。 以下のような設定を Grid に追加します。
    grid.addThemeVariants(
            GridVariant.LUMO_NO_BORDER,
            GridVariant.LUMO_NO_ROW_BORDERS,
            GridVariant.LUMO_ROW_STRIPES);
変更は以上です。簡単ですね。

続いてアカウントの 編集処理までやりましょう。
AccountService の追加
アカウント編集用に、以下のような AccountService を作成しておきましょう。
package vaadin.spring.app;

import org.springframework.stereotype.Service;
import vaadin.spring.domain.Account;
import vaadin.spring.domain.AccountRepository;
import javax.transaction.Transactional;

@Service
@Transactional
public class AccountService {
    private final AccountRepository repository;

    public AccountService(AccountRepository repository) {
        this.repository = repository;
    }

    public void save(Account account) {
        repository.save(account);
    }
    public void delete(Account account) {
        repository.delete(account);
    }
}
こちらは Spring の世界です。@Service と @Transactional でアノテートしてあげます。
このサービスを View コンポーネントからコールすることにします。
アカウント編集フォームの作成
アカウント編集用のフォームコンポーネントを作成しましょう。
@UIScope
@SpringComponent
public class AccountForm extends FormLayout {

    private final AccountService service;

    private final TextField name  = new TextField("NAME");
    private final TextField email = new TextField("EMAIL");

    private final Button save   = new Button("Save");
    private final Button delete = new Button("Delete");
    private final Button cancel = new Button("Cancel");

    private final Binder<Account> binder = new Binder<>(Account.class);

    public AccountForm(AccountService service) {
        this.service = service;
        // ...
    }
}
FormLayout というコンポーネントを継承しています。これを継承することで入力フォームのレイアウトを整えてくれたり、その他フォーム用の便利なメソッドが利用できます。
AccountForm は @SpringComponent でアノテートすることで、Spring のコンポーネントとして扱われます。
@SpringComponent は単なる Spring の Component のエイリアスです(Spring の Component と、Vaadin の Component の名前が衝突するため)。
@UIScope は DI のスコープを Vaadin の UI スコープに合わせるためのものです(Spring ではデフォルトで Singleton なので)。
入力用のテキストフィールドとボタンと、入力値とエンティティ間のデータバインド用の Binder を定義しています。
コンストラクタにて Binder を以下のように設定します。
    public AccountForm(AccountService service) {
        this.service = service;

        binder.forField(name)
            .bind(Account::getName, Account::setName);
        binder.forField(email)
            .bind(Account::getEmail, Account::setEmail);

        save.addClickListener(e -> save());
        delete.addClickListener(e -> delete());
        cancel.addClickListener(e -> cancel());

        add(name, email,
            new HorizontalLayout(save, delete, cancel));
    }
binder.forField() で TextField のインスタンスを指定し、マッピング用のメソッドを指定しています。
フォームクラスのフィールド名とEntity クラスのフィールド名が同じ場合は、単に binder.bindInstanceFields(this); とするだけで勝手にバインドされます。しかしフィールド名の変更時などにコンパイルエラーとして検知できなくなるので、個別に指定しておいた方が安全です。
その後、Button に対するリスナーを追加しており、それぞれのメソッドは以下のような実装にしましょう。
    private void save() {
        if (binder.validate().isOk()) {
            service.save(binder.getBean());
            setAccount(null);
            fireEvent(new ChangeEvent(this));
        }
    }

    private void delete() {
        service.delete(binder.getBean());
        setAccount(null);
        fireEvent(new ChangeEvent(this));
    }

    private void cancel() {
        setAccount(null);
        fireEvent(new CancelEvent(this));
    }
やっていることは、それぞれのボタンクリックに応じてサービスに処理を委譲しているだけです。
binder.getBean() で、フォームの入力項目が反映された Entity を得ることができます。
fireEvent() では、ボタン操作に応じて、コンポーネントからイベントを発火させています。
この後で扱いますが、このフォームはダイアログとして表示するつもりなので、アカウントの新規追加が行われたら、ダイアログを閉じて、一覧の内容を更新するなどを、このフォームの利用者側に任せたいのです。
イベント自体は ComponentEvent を継承して作成します。
public class AccountForm extends FormLayout {
    // ...

    public class ChangeEvent extends ComponentEvent<AccountForm> {
        public ChangeEvent(AccountForm source) {
            super(source, false);
        }
    }

    public class CancelEvent extends ComponentEvent<AccountForm> {
        public CancelEvent(AccountForm source) {
            super(source, false);
        }
    }


    public Registration addChangeListener(
            ComponentEventListener<ChangeEvent> listener) {
        return addListener(ChangeEvent.class, listener);
    }

    public Registration addCancelListener(
            ComponentEventListener<CancelEvent> listener) {
        return addListener(CancelEvent.class, listener);
    }
}
このフォームに、addChangeListener() や addCancelListener() といったメソッドで、コールバックを登録できるようにしておきます。
最後にもう一つメソッドを追加しておきましょう。
public class AccountForm extends FormLayout {
    // ...
    public void setAccount(Account account) {
        binder.setBean(account);
        if (Objects.nonNull(account)) {
            name.focus();
            delete.setVisible(!account.isNew());
        }
    }
}
フォームであつかう Entity を外部から設定するメソッドです。
新規登録時には削除は不要なのでボタンを非表示にする処理も入れておきました。
すこし長くなってしまいましたが、フォームの作成はこれで終了です。
アカウント編集ダイアログの作成
最初に、先ほど作成した AccountForm を Spring によるコンストラクタインジェクションで受け取る処理を追加します。
public class Accounts extends ViewFrame {

    private final AccountForm accountForm;
    private final Button addAccountBtn = new Button("Add new Account");

    public Accounts(
            AccountRepository repository,
            AccountForm accountForm) {

        this.accountForm = accountForm;
        // ...
    }
}
ついでに、新規アカウント登録用のボタンも準備しておきました。
続いて、ダイアログを作成する処理を追加しましょう。
public class Accounts extends ViewFrame {
     // ...
    private Dialog createAccountDialog() {
        Dialog dialog = new Dialog(accountForm);
        dialog.setCloseOnOutsideClick(false);
        accountForm.addChangeListener(c ->  {
            dialog.close();
            listAccounts();
        });
        accountForm.addCancelListener(c -> dialog.close());
        return dialog;
    }
}
Vaadin に用意されている Dialog コンポーネントをそのまま使います。
先ほどフォーム側に追加した addChangeListener() と addCancelListener() でコールバックを登録しています。
フォームによる更新があれば、ダイアログを閉じて一覧更新、キャンセルされた場合は単にダイアログを閉じています。
さて、最後にコンポーネントを組み上げましょう。
public class Accounts extends ViewFrame {

    private Component createContent() {

        Dialog dialog = createAccountDialog();

        // 一覧のレコードをダブルクリックで編集ダイアログ
        grid.addItemDoubleClickListener(e -> {
            accountForm.setAccount(e.getItem());
            dialog.open();
        });

        // 追加ボタンで新規作成ダイアログ
        addAccountBtn.addClickListener(e -> {
            accountForm.setAccount(new Account());
            dialog.open();
        });

        return new FlexLayout(new VerticalLayout(
                new H4("Accounts"),
                new HorizontalLayout(filterText, addAccountBtn),
                grid));
    }
}
アプリケーションの実行
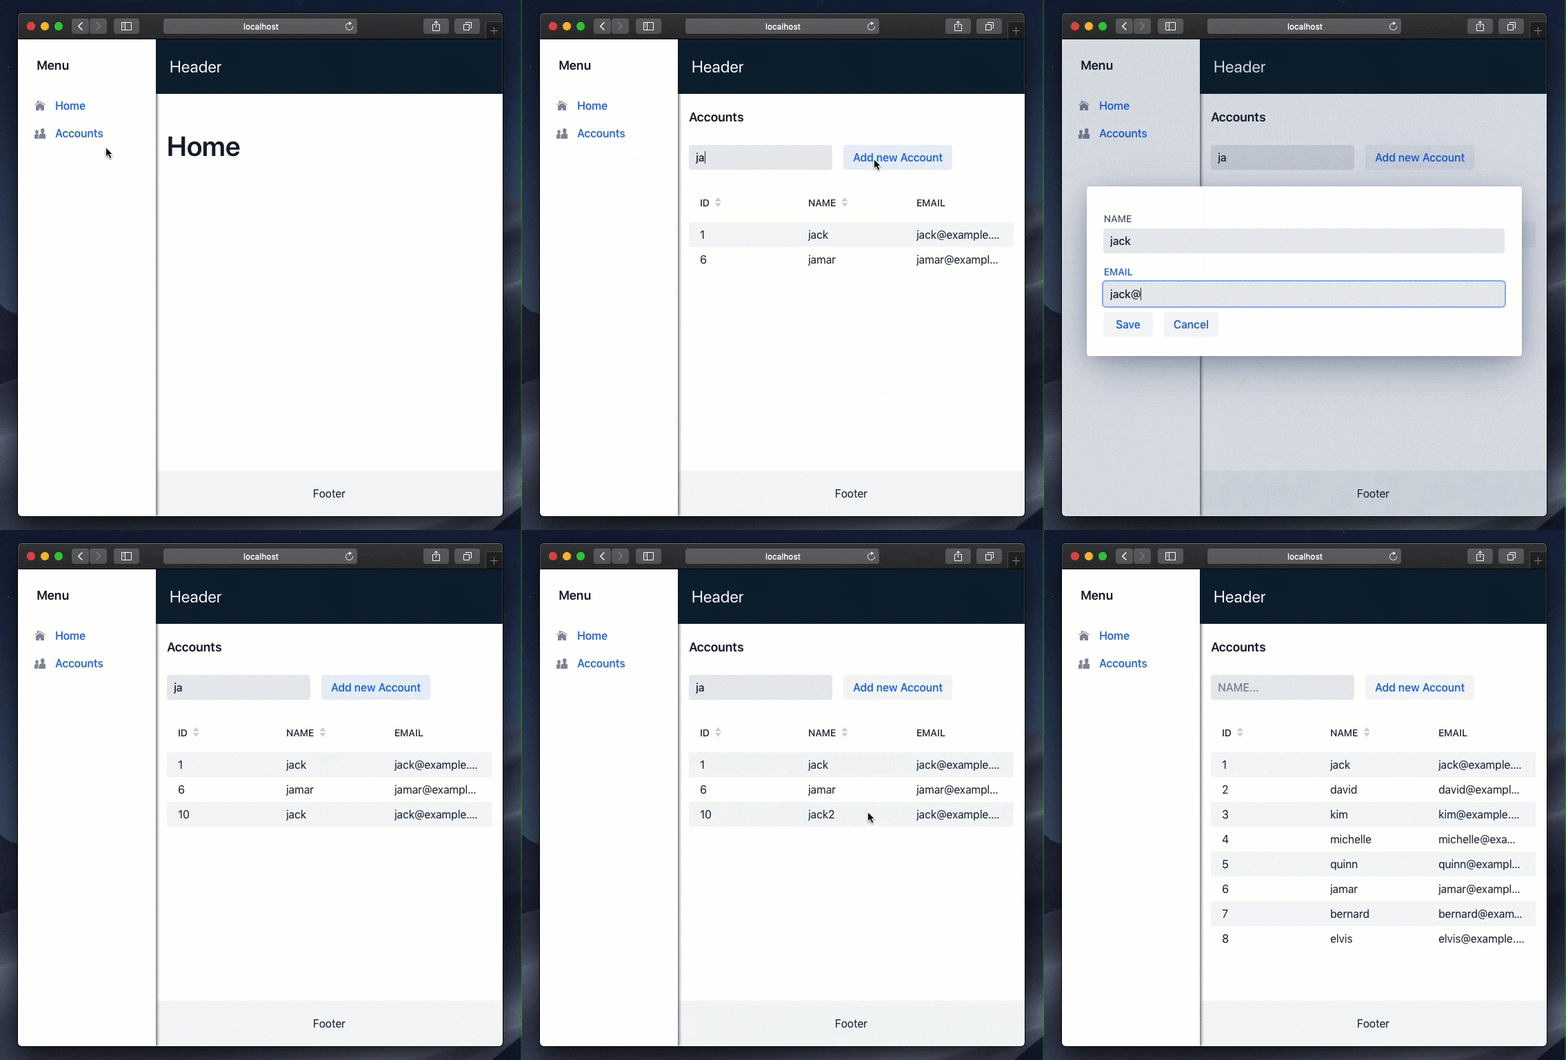
アプリケーションを実行してみましょう。
$ ./gradlew bootRun

まとめ
Vaadin によるアプリケーション作成をチュートリアル形式で見てきました。
さすがに凝ったアプリケーションになると、JavaScript を使う場面も出てはきますが、下準備さえできてしまえば Java の世界で完結して Web アプリケーションの開発ができます(ここでは扱いませんでしたが、もちろん Vaadin でも JavaScript を扱えます)。
嬉しいのは、様々なUIコンポーネントが利用できるのもありますが、なにより変更時の不整合がコンパイルエラーとして検知できる点です。
UI に大きな制約が不要な社内管理画面などは、Vaadin 利用で捗ったものになると思います。
みなさんも試してみてはいかがでしょうか。

Vaadin 7 Cookbook by Jaroslav Holan Ondrej Kvasnovsky(2013-04-24)
- 作者:Jaroslav Holan Ondrej Kvasnovsky
- 出版社/メーカー: Packt Publishing
- 発売日: 1652
- メディア: 文庫

Vaadin: The best Java framework for Progressive Web Apps (English Edition)
- 作者:Vullam Publishers
- 発売日: 2019/10/20
- メディア: Kindle版

Vaadin 7 UI Design By Example: Beginner's Guide
- 作者:Alejandro Duarte
- 出版社/メーカー: Packt Publishing
- 発売日: 2013/07/26
- メディア: ペーパーバック