
OrientDB とは
- 100% Pure Java の NoSQL データベース
- ドキュメント指向型 と グラフ型 のデータベースを扱える
- ライセンスは Apache 2 license
- NoSQLだけど SQL が使える
- 組み込み/サーバのどちらもOK
- Github https://github.com/orientechnologies/orientdb
- バイナリダウンロード http://www.orientechnologies.com/download/
ビルド
ダウンロードサイトから落としても同じだが、せっかくなのでビルドする。
ant を使うので入っていない場合は brew などで入れておく。
brew install ant
clone して ant でビルドするだけ。
git clone https://github.com/orientechnologies/orientdb.git
cd orientdb
ant -Dorientdb.test.env=release clean install
-D にてプロパティ与えているのは、素で clean install とすると、後の例で使うGratefulDeadConcerts というサンプルデータベースが作成されないため。
成果物はプロジェクトフォルダの並びに作成される。
cd ../releases/orientdb*
起動
必要に応じて実行権限つけておく。
chmod 755 bin/*.sh
chmod -R 777 config
起動スクリプト叩けば起動する。
./bin/server.sh
初回起動時には以下のようにパスワードの入力が求められる。
・・・

+---------------------------------------------------------------+
|                WARNING: FIRST RUN CONFIGURATION               |
+---------------------------------------------------------------+
| This is the first time the server is running. Please type a   |
| password of your choice for the 'root' user or leave it blank |
| to auto-generate it.                                          |
|                                                               |
| To avoid this message set the environment variable or JVM     |
| setting ORIENTDB_ROOT_PASSWORD to the root password to use.   |
+---------------------------------------------------------------+

Root password [BLANK=auto generate it]:
ここで root のパスワードを設定するか、未入力にすると自動的にパスワードが作成される。
パスワードは config/orientdb-server-config.xml の <users> 要素に反映される。
利用ポートは以下
| port | 説明 |
|---|---|
| 2424 | クライアントやドライバからのバイナリデータ操作用 |
| 2480 | RESTful API による HTTP 経由での操作用 |
OrientDB Studio
起動したら以下のURLにアクセスすると OrientDB Studio からGUIで操作できる。
http://localhost:2480
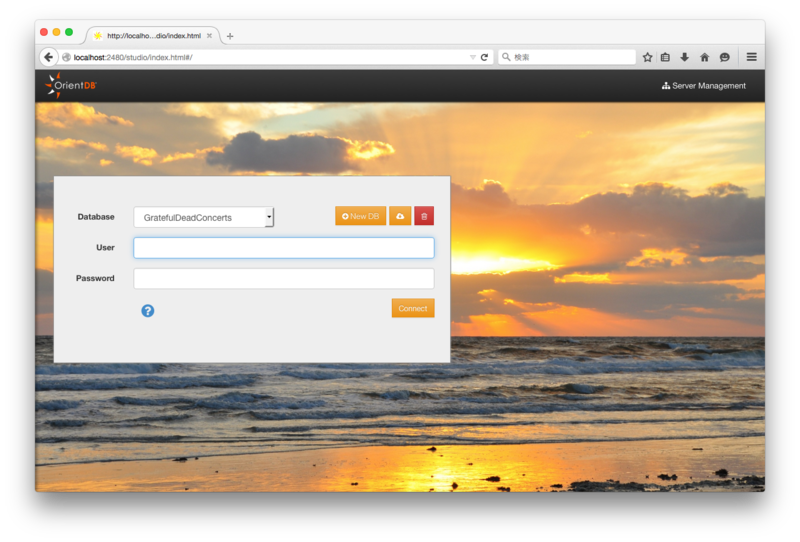
ログイン画面で データベースに GratefulDeadConcerts ユーザ/パスワードはさきほど設定したroot/<password> か admin/admin で接続できる。
GratefulDeadConcerts はグラフデータベースとなっている。
クエリの実行
Browse メニュー内でクエリの実行ができる。
select * from V
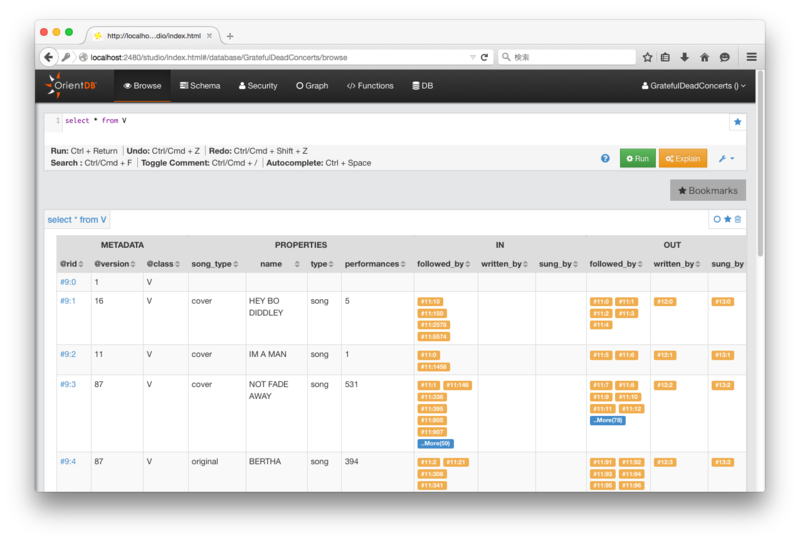
name を指定してクエリを実行。
select * from V where name = "HEY BO DIDDLEY"

右下にある表示方法を Raw に切り替えると、クエリの取得結果が生のJsonで見ることができる。
{
    "result": [
        {
            "@type": "d",
            "@rid": "#9:1",
            "@version": 16,
            "@class": "V",
            "name": "HEY BO DIDDLEY",
            "song_type": "cover",
            "type": "song",
            "performances": 5,
            "out_followed_by": [
                "#11:0",
                "#11:1",
                "#11:2",
                "#11:3",
                "#11:4"
            ],
            "out_written_by": [
                "#12:0"
            ],
            "out_sung_by": [
                "#13:0"
            ],
            "in_followed_by": [
                "#11:10",
                "#11:150",
                "#11:2578",
                "#11:5574"
            ],
            "@fieldTypes": "out_followed_by=g,out_written_by=g,out_sung_by=g,in_followed_by=g"
        }
    ],
    "notification": "Query executed in 0.063 sec. Returned 1 record(s)"
}
@rid がドキュメントを一意に特定するための ID で #クラスタ:クラスタ内のID の形式となる。
Documents と Graphs
OrientDB は ドキュメント指向のデータを扱うことができ、これは他の NoSQL データベースと同様。
加えてグラフ型のデータベースでもあり、データ間の関連をグラフ構造で保持する。
先ほどの Studio で以下のクエリを実行してみる。
select * from V where name = "HEY BO DIDDLEY" OR name = "Bo_Diddley"
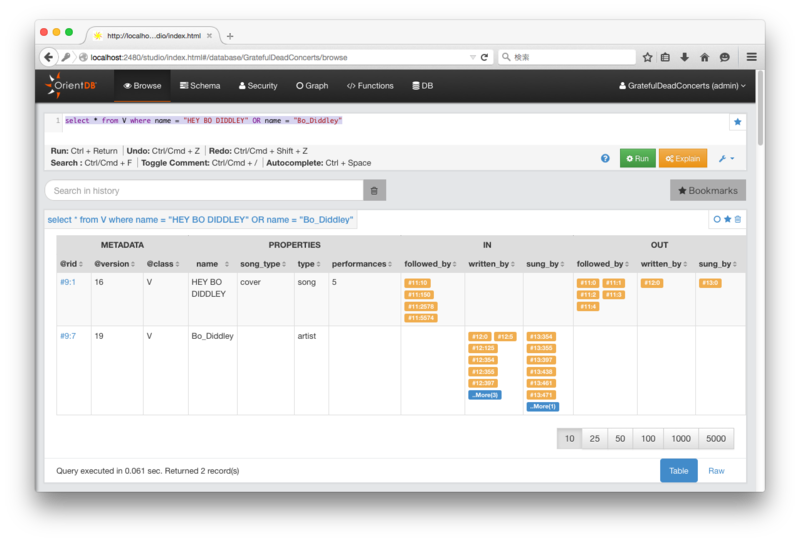
2レコードが選択され、それぞれの type には song と artist が表示されている。
各レコードが vertex (頂点、または node とも呼ばれる)で、@class には V が表示されている。
vertex を繋ぐ関連が edge (relation とも呼ばれる) で、この例だと followed_by や writen_by に表示されている。
例えば、さきほどのクエリの結果である Bo_Diddley という名前の vertex の written_by には #12:0 というIDの edge がある。
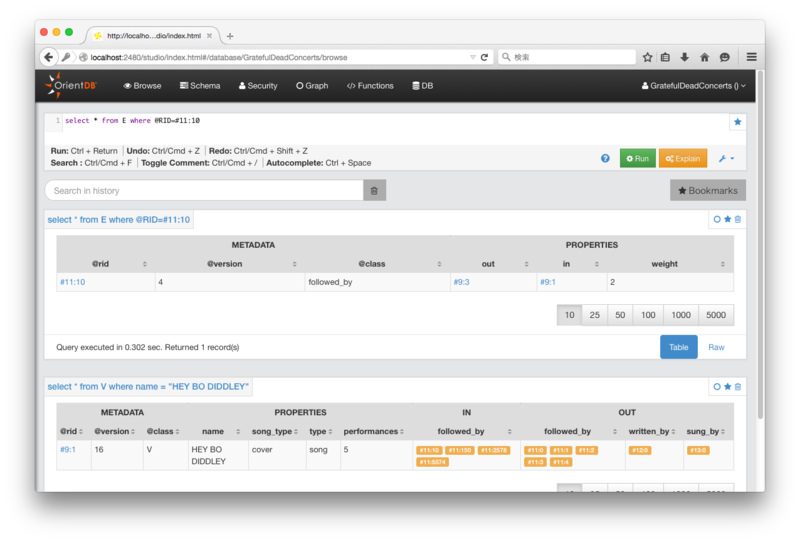
これをクリックすると以下のような edge となっている。
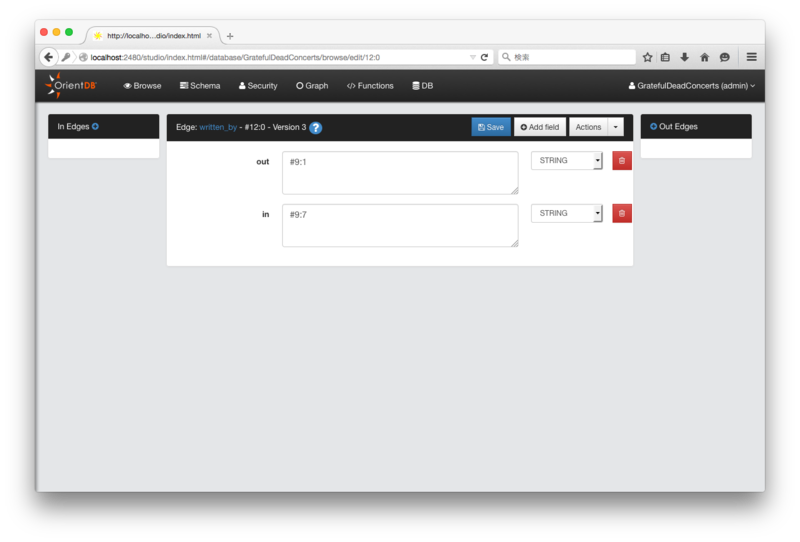
out が #9:1 という ID で、これは HEY BO DIDDLEY という名前の vertex (song) への written_by という関連であることがわかる。
Classes と Clusters
Studio のメニューから Schema を選択すると以下の表示が得られる。
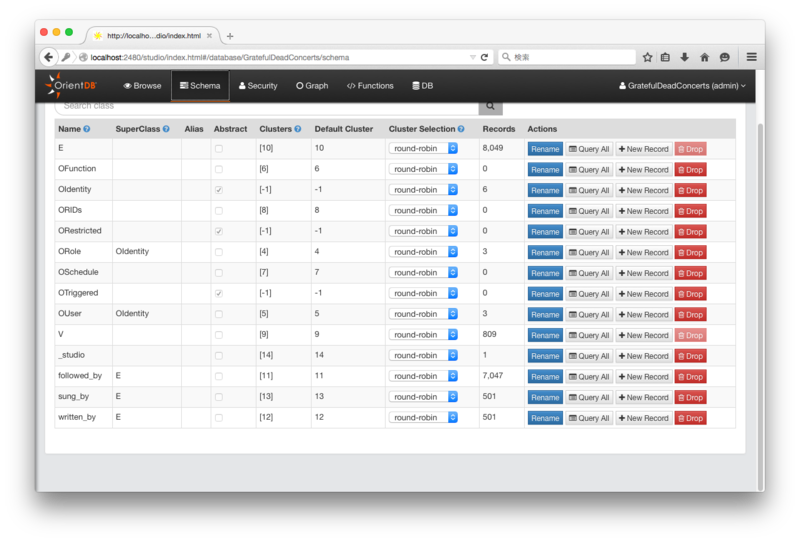
ここで表示されるレコードが class で、ドキュメントはこの class に格納される。class には制約やルールが定義できる。
Clusters というカラムが表示されている。これは RDBS におけるテーブルに近いもので、レコードの格納先となる。 デフォルトでは1つのclass につき 1つの Cluster が割り当てられる。
クエリ
Edge を取得。
SELECT * FROM E
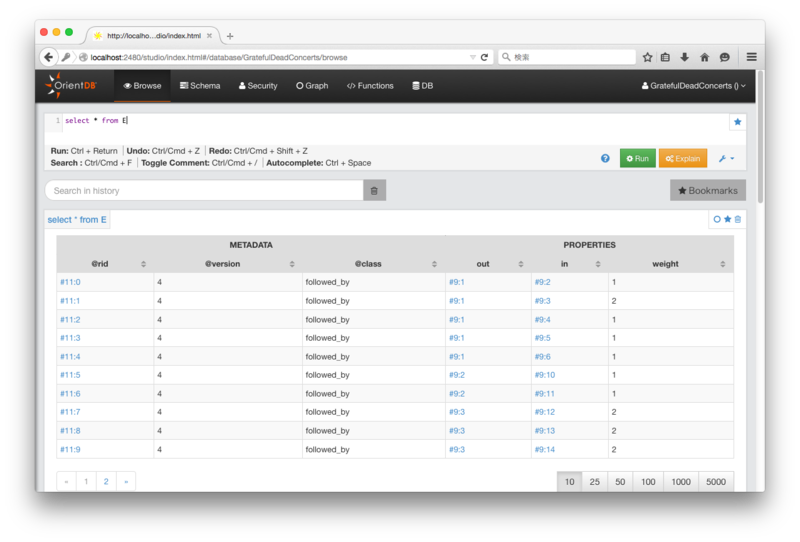
@RID で絞り込み。
SELECT * FROM E WHERE @RID=#11:10
@RID は省略して以下のようにもできる。
SELECT * FROM #9:3
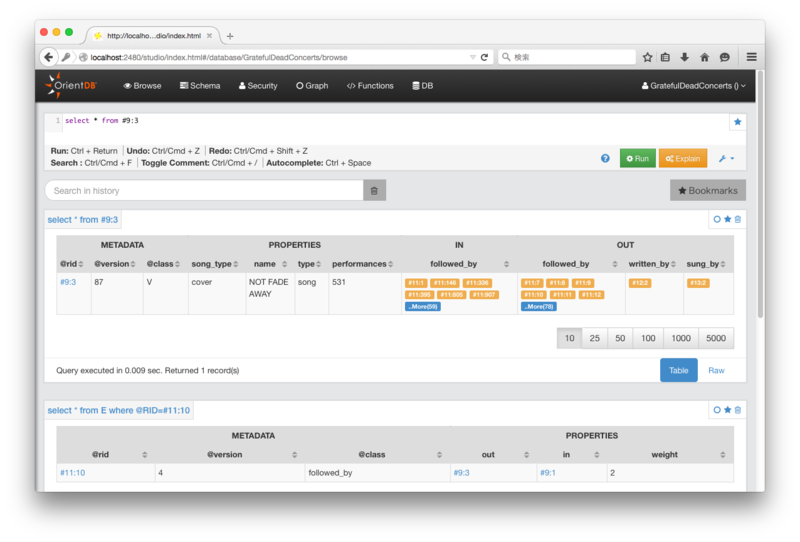
コンソール起動
コンソールからの操作は以下のスクリプトを実行。
./bin/console.sh
以下のようになり、orientdb のプロンプトとなりコマンドが実行できるようになる。
OrientDB console v.2.0.3 (build 1) www.orientechnologies.com
Type 'help' to display all the supported commands.
Installing extensions for GREMLIN language v.2.6.0

orientdb>
データベースへの接続
接続は connect コマンド。
connect remote:localhost root <password>
パスワードは初回起動時に説定したもので接続。
以下のようなプロンプト表示となり接続ができる。
Connecting to remote Server instance [remote:localhost] with user 'root'...OK
orientdb {server=remote:localhost/}>
データベースのリストを表示。
list databases
サンプルのデータベースがリストされる。
Found 1 databases:

* GratefulDeadConcerts (plocal)
GratefulDeadConcerts データベースへ接続。
connect remote:localhost/GratefulDeadConcerts admin admin
以下のようになりプロンプトにデータベース名が表示される。
Disconnecting from remote server [remote:localhost/]...
OK
Connecting to database [remote:localhost/GratefulDeadConcerts] with user 'admin'...OK

orientdb {db=GratefulDeadConcerts}>
クエリの実行
Studio での操作と同じようにクエリ実行できる。
orientdb {db=GratefulDeadConcerts}> select * from V

----+-----+------+---------+-------------------------------+------+--
#   |@RID |@CLASS|song_type|name                           |type  |
----+-----+------+---------+-------------------------------+------+--
0   |#9:0 |V     |null     |null                           |null  |
1   |#9:1 |V     |cover    |HEY BO DIDDLEY                 |song  |
2   |#9:2 |V     |cover    |IM A MAN                       |song  |
3   |#9:3 |V     |cover    |NOT FADE AWAY                  |song  |
4   |#9:4 |V     |original |BERTHA                         |song  |
5   |#9:5 |V     |cover    |GOING DOWN THE ROAD FEELING BAD|song  |
6   |#9:6 |V     |cover    |MONA                           |song  |
7   |#9:7 |V     |null     |Bo_Diddley                     |artist|
8   |#9:8 |V     |null     |Garcia                         |artist|
9   |#9:9 |V     |null     |Spencer_Davis                  |artist|
・・・省略
----+-----+------+---------+-------------------------------+------+--
LIMIT EXCEEDED: resultset contains more items not displayed (limit=20)

20 item(s) found. Query executed in 0.111 sec(s).
classes 一覧
以下のコマンドでclassの一覧が取得できる。
classes
以下のような出力が得られる。
CLASSES
---------------------+-----------------+------------+----------------+
 NAME                | SUPERCLASS      | CLUSTERS   | RECORDS        |
---------------------+-----------------+------------+----------------+
 _studio             |                 | 14         |              1 |
 E                   |                 | 10         |              0 |
 followed_by         | E               | 11         |           7047 |
 OFunction           |                 | 6          |              0 |
 OIdentity           |                 | -          |              0 |
 ORestricted         |                 | -          |              0 |
 ORIDs               |                 | 8          |              0 |
 ORole               | OIdentity       | 4          |              3 |
 OSchedule           |                 | 7          |              0 |
 OTriggered          |                 | -          |              0 |
 OUser               | OIdentity       | 5          |              3 |
 sung_by             | E               | 13         |            501 |
 V                   |                 | 9          |            809 |
 written_by          | E               | 12         |            501 |
---------------------+-----------------+------------+----------------+
 TOTAL = 14                                                     8865 |
---------------------+-----------------+------------+----------------+
clusters 一覧
clusters
以下のような出力が得られる。
CLUSTERS
----------------+-------+-------------------+----------------+
 NAME           | ID    | CONFLICT STRATEGY | RECORDS        |
----------------+-------+-------------------+----------------+
 _studio        |    14 |                   |              1 |
 default        |     3 |                   |              0 |
 e              |    10 |                   |              0 |
 followed_by    |    11 |                   |           7047 |
 index          |     1 |                   |              5 |
 internal       |     0 |                   |              3 |
 manindex       |     2 |                   |              1 |
 ofunction      |     6 |                   |              0 |
 orids          |     8 |                   |              0 |
 orole          |     4 |                   |              3 |
 oschedule      |     7 |                   |              0 |
 ouser          |     5 |                   |              3 |
 sung_by        |    13 |                   |            501 |
 v              |     9 |                   |            809 |
 vegetable      |    15 |                   |              0 |
 written_by     |    12 |                   |            501 |
----------------+-------+-------------------+----------------+
 TOTAL = 16                                 |           8874 |
----------------+---------------------------+----------------+
新しい class の作成
class の作成は以下のコマンドで行う。
create class New_class
作成した class に プロパティを追加するには以下のコマンド。
create property New_class.field_name data_type
vegetables というクラスといくつかのプロパティを定義。
create class Vegetable
create property Vegetable.name string
create property Vegetable.color string
create property Vegetable.quantity integer
create property Vegetable.good_on_pizza boolean
class の内容確認
以下のコマンドで作成した class の内容を一覧できる。
info class Vegetable
Class................: Vegetable
Default cluster......: vegetable (id=15)
Supported cluster ids: [15]
Cluster selection....: round-robin
PROPERTIES
----------------+----------+-------------------+-----------+----------+----------+-------+-------+----------+
 NAME           | TYPE     | LINKED TYPE/CLASS | MANDATORY | READONLY | NOT NULL |  MIN  |  MAX  | COLLATE  |
----------------+----------+-------------------+-----------+----------+----------+-------+-------+----------+
 quantity       | INTEGER  | null              | false     | false    | false    |       |       | default  |
 color          | STRING   | null              | false     | false    | false    |       |       | default  |
 name           | STRING   | null              | false     | false    | false    |       |       | default  |
 good_on_pizza  | BOOLEAN  | null              | false     | false    | false    |       |       | default  |
----------------+----------+-------------------+-----------+----------+----------+-------+-------+----------+
レコードの挿入
レコードを登録してみる。
insert into Vegetable (quantity, color, name, good_on_pizza) values (1, 'red', 'tomato', true)
insert into Vegetable (quantity, color, name, good_on_pizza) values (1, 'green', 'cucumber', false)
プロパティとして定義していない smell を追加して登録。
insert into Vegetable (quantity, color, name, good_on_pizza, smell) values (1, 'green', 'basil', true, 'strong')
スキーマレスなので問題なく登録できる。
違いは、プロパティとして事前定義しておくと制約やインデックスが利用できる点。
レコードの参照
以下のコマンドで class の内容が一覧できる。
browse class Vegetable
以下のように表示される。
orientdb {db=GratefulDeadConcerts}> browse class Vegetable

----+-----+---------+--------+-----+--------+-------------+------
#   |@RID |@CLASS   |quantity|color|name    |good_on_pizza|smell
----+-----+---------+--------+-----+--------+-------------+------
0   |#15:0|Vegetable|1       |red  |tomato  |true         |null
1   |#15:1|Vegetable|1       |green|cucumber|false        |null
2   |#15:2|Vegetable|1       |green|basil   |true         |strong
----+-----+---------+--------+-----+--------+-------------+------
SQL も使えるので以下でも同じ結果が得られる。
select * from Vegetable
レコードの内容は以下で確認できる。
load record #15:0
以下のように表示される。
orientdb {db=GratefulDeadConcerts}> load record #15:0

+-------------------------------------------------------------------+
| Document - @class: Vegetable        @rid: #15:0    @version: 1    |
+-------------------------------------------------------------------+
|                     Name | Value                                  |
+-------------------------------------------------------------------+
|                 quantity | 1                                      |
|                    color | red                                    |
|                     name | tomato                                 |
|            good_on_pizza | true                                   |
+-------------------------------------------------------------------+
Graph の作成
vertex と edge は それぞれ V E という class を拡張して作成できる。
Vertex
V を拡張した Animal という class を作成。
create class Animal extends V
同様に Food と Environment を作成。
create class Food extends V
create class Environment extends V
Edge
同様に edge は E を拡張して作成。
create class Eat extends E
create class Live extends E
Vertex の登録
以下のコマンドで vertex の登録ができる。
create vertex Animal set name = 'Rabbit'
create vertex Food set name = 'Carrot'
create vertex Environment set name = 'Forest'
browse class Animal
Edge の登録
Edge の登録。
Rabbit と Carrot は Eat という関係。
create edge Eat from (select from Animal where name = 'Rabbit') to (select from Food where name = 'Carrot')
全ての Animal は Forest に Live という関係。
create edge Live from (select from Animal) to (select from Environment)
Graph の照会
Animal の持つ関連(Edge)を数える。
select in(), out() from Animal
Animal は Rabbit しか登録していないので、Rabbit には out 方向の 2つの Edge があることがわかる。
orientdb {db=GratefulDeadConcerts}> select in(), out(), both() from Animal

----+------+----+----+----
#   |@CLASS|in  |out |both
----+------+----+----+----
0   |null  |[0] |[2] |[2]
----+------+----+----+----
expand() を使うと vertex のコレクションを展開できる。
select expand( out() ) from Animal
以下のような結果となる。
orientdb {db=GratefulDeadConcerts}> select expand( out() ) from Animal

----+-----+-----------+------+--------+--------
#   |@RID |@CLASS     |name  |in_Eat  |in_Live
----+-----+-----------+------+--------+--------
0   |#17:0|Food       |Carrot|[size=1]|null
1   |#18:0|Environment|Forest|null    |[size=1]
----+-----+-----------+------+--------+--------
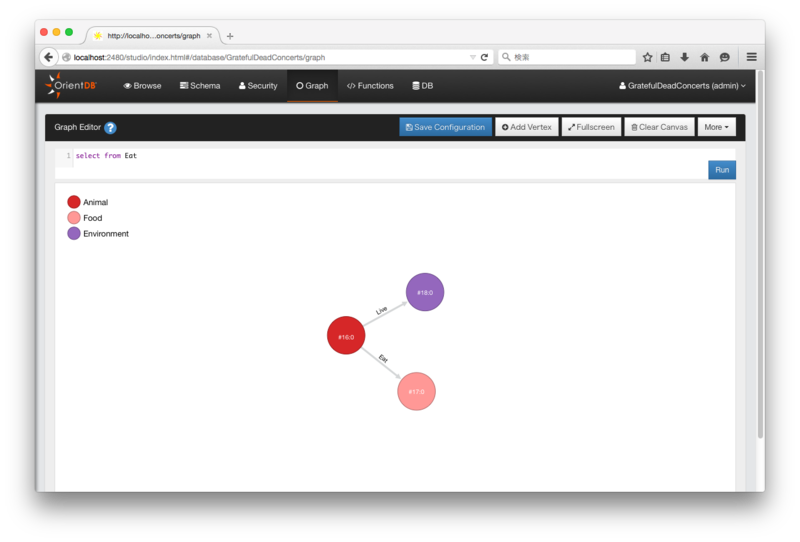
Studio で Graph を見る
Studio の Graph メニューで以下のようなクエリを1つずつ実行する。
select from Animal
select from Food
select from Environment

select from Eat
select from Live
以下のように関係がグラフとして照会できる。
次回は Java からの利用例。

Getting Started with OrientDB (English Edition)
- 作者:Claudio Tesoriero
- 出版社/メーカー: Packt Publishing
- 発売日: 2013/11/22
- メディア: Kindle版

NoSQLプログラミング実践活用技法 (Programmer’s SELECTION)
- 作者:Shashank Tiwari
- 出版社/メーカー: 翔泳社
- 発売日: 2012/05/18
- メディア: 大型本